Furniture Makeover: Edna > Juliette
- Mar 4, 2017
- 3 min read

BACKGROUND:
I'm project-oriented, hands-on, would rather go to the dentist than read instructions, I love a good deal, and love a good furniture makeover even better. I'm not afraid to get my hands dirty and with that said, am not afraid to go to the store mid-project, partially covered in paint. Usually it's the craft or hardware store at this point, so I figure they have to see more than just me decorated in paint and in my finest painting clothes. One of my many hobbies is to repurpose and update furniture pieces. Below you'll find step-by step instructions on how to give furniture a makover, peppered with behind-the-scenes comic relief.
DRESSER CHALLENGE (EDNA):
When loading up my POD to move across the country to North Carolina, I made sure to bring a few fixer-upper pieces to keep me entertained. Edna is one such piece that made the cut. I adopted Edna from an estate sale for $30 so I'm guessing she was previously loved and adored for many years. When the POD made its way to the East coast, she arrived just as I remembered...a dingy yellow color, some bumps and scratches (probably a few more from the hike), and definitely in need of a few fresh coats of paint and an update. I knew she had potential though.

1st STEPS:
I began her makeover by first removing all of Edna's jewelry aka the hardware. I then used a small hand-held power sander and gave her a good sanding. I started with coarse sand paper (around 60 grit), then moved to finer grit paper (120-180). The higher the number, the finer the sandpaper. I inspected the damage and noticed a few cracks so I proceeded to fill in the cracks with wood filler, and then I sanded her once more for good measure.
CHALK PAINT:
I decided to go with a cream chalk paint. I used General Finishes Bone White. I painted about 3 coats of the cream, letting each one dry in-between. I then moved onto the facelift. I decided Edna needed a new update and some attention to her ornate detail, so I decided to go with a limestone grey to accent her unique attributes.


FINISHING TOUCHES:
I usually like to distress pieces, but I opted to keep this piece un-distressed as I figured she will get her fair share of distressing over the years. I finished the piece by liberally applying Annie Sloan clear wax to seal the paint and give her a beautiful finish.

HARDWARE:
I completed Edna by updating her jewelry (hardware). Since this hardware had some character, I decided to keep it for now instead of buying new, and opted to instead give it a fresh look. It was brass before so I used a combo of Rub 'n Buff silver leaf paint along with a little gold to keep it looking a little rustic. I just used a sponge brush and just gently tapped the paint where I wanted it. Heads up, this product gets on everything, so wear gloves when using it.

I finished the hardware with a few coats of Minwax Polycrylic Protective Finish Spray to ensure the new look wouldn't rub off on my hands when opening the drawers.

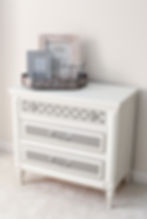
FINAL PRODUCT (JULIETTE):
The final product turned out better than I was hoping. Juliette is now the home to my many music books and some of my photography props. After all is said and done, I think she's ready for a new name, as Edna just doesn't seem to suit her anymore. I think I'll name her Juliette as that sounds like a classy name with a bit of history and intrigue to it. :)

STYLE DECOR:
Adding a little flair makes this piece come to life while also giving Juliette the rustic touch I was looking for.
Thanks for reading and hope you found something helpful, funny, or inspiring! Feel free to leave comments or questions below! Check out more How To's and Before & After's on my HOME MAKEOVERS page!
SaveSaveSaveSaveSaveSave