


Furniture Makeover: Gertrude > Adelynne
- Mar 10, 2017
- 6 min read

BACKGROUND:
I'm project-oriented, hands-on, would rather go to the dentist than read instructions, I love a good deal, and love a good furniture makeover even better. I'm not afraid to get my hands dirty and with that said, am not afraid to go to the store mid-project, partially covered in paint. Usually it's the craft or hardware store at this point, so I figure they have to see more than just me decorated in paint and in my finest painting clothes. One of my many hobbies is to repurpose and update furniture pieces. Below you'll find step-by step instructions on how to give furniture a makover, peppered with behind-the-scenes comic relief.
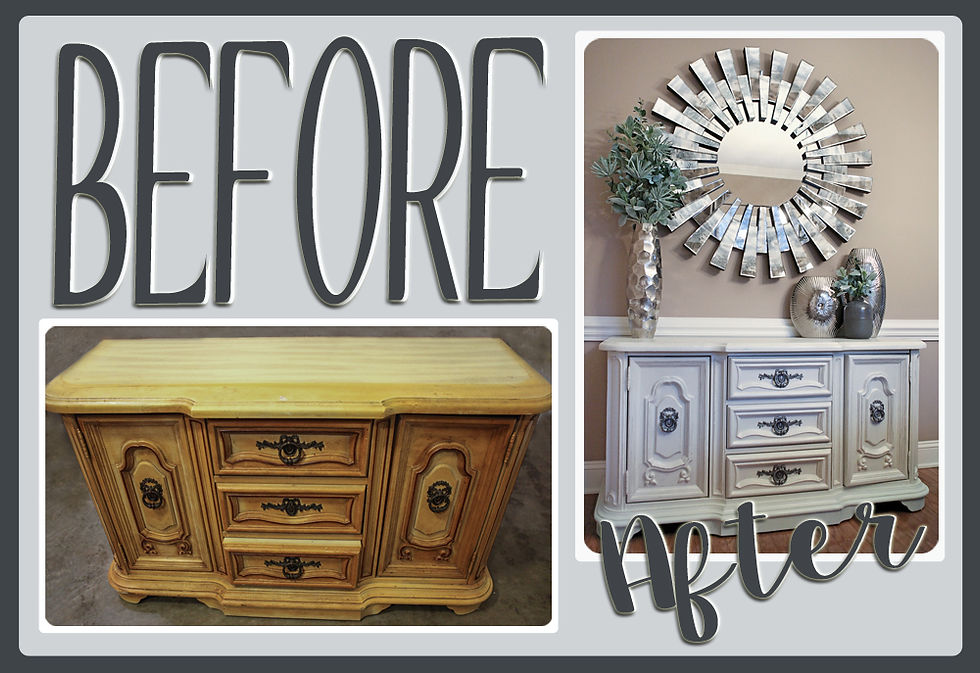
BUFFET CHALLENGE (GERTRUDE):
When I moved to North Carolina, my first larger piece that I conquered (or maybe it conquered me) was this beauty... Mustard yellow-stained buffet that was in need of not only an update but also some TLC. Let's call her Gertrude. I found Gerty at an antique shop back in Nebraska. They were originally asking $250 (who knows why?), but with my negotiating skills learned from Gramps, I talked them down to $100. I felt it was still a little high, given Gerty's dire condition, but I knew she had potential to turn into a real Southern belle... With that said, she made the move to North Carolina where she sat in the garage for a week before I began her makeover.

1st STEPS:
First, I removed all of Gerty's jewelry aka the hardware (and only lost one screw so felt that was a minor victory). Backup, I actually first draped plastic underneath Gertrude to avoid mayhem later. I then used a small hand-held power sander and sanded the heck out of her. And re-sanded, and sanded again. I started with coarse sand paper (around 60 grit), then moved to finer grit paper (120-180). The higher the number, the finer the sandpaper. Unless I was going to spend all month on this piece, there was no way I was going to keep sanding until all the mustard yellow was gone. I settled for "close enough".

I then inspected the damage and noticed quite a few cracks and small nail holes. I proceeded to fill in the cracks with wood filler, and then I sanded the baby again. My hubby did help me with some of the final sanding so credit given where credit is due. :)
STAIN (INITIAL PLAN):
My take was to stain the buffet to match my dining room table. I have stained many pieces before, so didn't think this would be a problem, or take long... But I've never stained a mustard yellow pre-stained, antique piece of work like this, so this was a new challenge...
I clothed myself in my best painting garb along with latex gloves (this stuff is insanely messy and extremely difficult to remove from your skin/hands, so wear gloves at all times). I found my favorite sponge, turned on some tunes, and was ready to rock and roll.

I applied one coat of Varathane Wood Stain in the color Briarsmoke (with plans to add the Carbon Gray color to match my dining room table). I waited for it to dry, and waited, and waited some more.

GIF compliments of GIPHY.com
I then said, heck with the drying as the nasty yellow color was already creeping back. Over the course of the day, I liberally applied about 3 more coats of stain only to discover that the stain kept turning a blue-ish color. No matter how many more coats I applied, the blue color was inevitable. At this point, my frustration levels were high as I was painting the piece in the garage on a brisk winter day with temps in the mid 30's. Not only did this mean the stain was drying EXTREMELY slowly, but my fingers were close to icicles. I know I should have been patient for a warmer day, but patience has never been my strong suit, and I wanted to get Gertrude done and moved into the house so we could use the garage again!
CHALK PAINT (NEW PLAN):
At this point, I decided to forego the stain idea and move onto a cream chalk paint. I used General Finishes Bone White but also am a fan of Annie Sloan's version called Old White as well. I digress. I will say it's worth it to spend the $25 on a good brush for chalk paint as I've compared the brushes to lesser expensive ones, and the nicer brushes do perform well above the others, for a variety of reasons. I also recommend getting some home-made soap, many times sold with the brushes or paint. Not only does the soap clean the brush, but it helps restore and condition the bristles as well.

Back to painting. Again, my lack of patience got the best of me, and I started slopping the paint on as a normal coat was not covering this baby. To save you the tedious details, let's just suffice it to say, due to the trifecta of the 4+ coats of now blue-ish stain as a base, my lack of patience and sloppy thick coats of paint, and the cold temperature, this 1-day project ended up being about 4 days... Not only did I regret slopping on the paint (mind you, MULTIPLE coats of slopped on paint), but I reached an all-time low where I almost dragged Gertrude out to the driveway to put a sign on her that said, "PLEASE take me, I'll pay YOU to take Gerty off my hands!" I gave it the ol' college try, but realizing that Gerty was a mere 150+ pounds, I decided against it. When my husband returned home from work that evening, I tried to talk him into dragging her out to the curb with me, but to no avail.
I took a day off to give it a rest, and then started at it again. Now instead of yellow showing through, the blue color kept rearing its ugly head just when I thought I had finished my last coat. After 5 coats of paint (3 initial thick sloppy coats, which resulted in me sanding all the many drips, which led to having to add 2 more coats of paint as the darn yellow started making an appearance somehow again), the piece was finished, for the most part.

FINISHING TOUCHES:
I ended up also applying some of the General Finishes Pearlizing Effects paint, which I am still undecided on whether or not I like the added pearlized finish on this piece. I also distressed the buffet by sanding the edges and any place where I thought it should look naturally worn, to give it a little more character. (See pictures below.) I finished the piece by liberally applying Annie Sloan clear wax to the piece to seal the paint and give it a beautiful finish.


HARDWARE:
I completed the piece by updating the hardware. Since this hardware had quite a bit of character, I decided to keep it instead of buying new, and opted to instead give it a facelift. I used a combo of Rub 'n Buff silver leaf paint along with a little gold to give it a face lift and have it coordinate with the mirror that would be hung above it. I just used a sponge brush and just gently tapped the paint where I wanted it. Heads up, this product gets on everything, so wear gloves when using it.


I finished the hardware with a few coats of Minwax Polycrylic Protective Finish Spray to ensure the new look wouldn't rub off on my hands when opening the buffet doors/drawers.
Extra fun fact. When I was painting the buffet inner shelves, I originally stained these the same color as the buffet (a combo of the Varathane Briarsmoke and Carbon Gray). After changing to the chalk paint, I gooped on the paint and set it up to dry. Being the graceful girl I am, I accidentally tripped on it which made the shelf fall onto the crumpled plastic I was using to line the garage floor. After saying a few choice words and picking up the shelf, I was pleasantly surprised to discover the accident turned into its own unique work of art (shown in picture with hardware and below picture). I decided to replicate this mistake (minus the tripping) to the other shelf as well. Just a fun reminder that there's beauty even in the chaos, you just have to look for it. :)

As our good friend Bob Ross would say...

GIF compliments of GIPHY.com
FINAL RESULT: ADELYNNE
The final product turned out better than I was anticipating so am thankful I didn't take the piece to the curb after all! After all that work, I think she's ready for a new name, as Gertrude just doesn't fit the bill anymore. I think I'll name her Adelynne as that sounds like a Southern Belle type of name with a nice ring to it.. :)


Thanks for reading and hope you found something helpful, funny, or inspiring! Feel free to leave comments or questions below! Check out more How To's and Before & After's on my HOME MAKEOVERS page!
SaveSaveSaveSaveSaveSave


Comments